So you’ve always photographed with the auto mode and it’s worked wonders for you? Now you’re trying to step up the quality of the pictures of your jewellery because you don’t see the results you were hoping for with auto mode?
I think it’s time you came to the big leagues and started using the manual mode.
Even though auto mode in most cameras nowadays does a great job of adjusting your aperture, shutter speed and ISO (don’t panic, I’ll explain), there are still times when you want to control your camera’s settings and have more freedom in your choices.
The first and most important thing you need to know when making the change from auto mode to the manual is: The Exposure Triangle.
The Exposure Triangle is made up of: Aperture, ISO and shutter speed.
Aperture: Is the opening of your lens through which light passes. The bigger the opening, the more light passes through and vice versa. Aperture also controls another important element, depth of field.
Depth of field is the amount of blur in your image beyond the subject you have chosen to be in focus. Shallow depth of field means you’re going to achieve a blurrier background but if you choose a deep depth of field the background is more clear. Now how do we adjust the aperture in our camera settings?
Aperture is shown with F stops in your camera settings. F stop is the ratio of the system’s focal length to the diameter of the entrance pupil (totally not important right now). What you should pay attention to here is that the smaller the number, the bigger the opening, and the bigger the number, the smaller the opening.
If you want to achieve a shallow depth of field you want a bigger opening hence you must choose a smaller number. If you want a deeper depth of field you need a smaller opening and a bigger number. Don’t be overwhelmed by all this, the easiest thing you can do is to write it down somewhere and look at it whenever you’re doubting your choice.
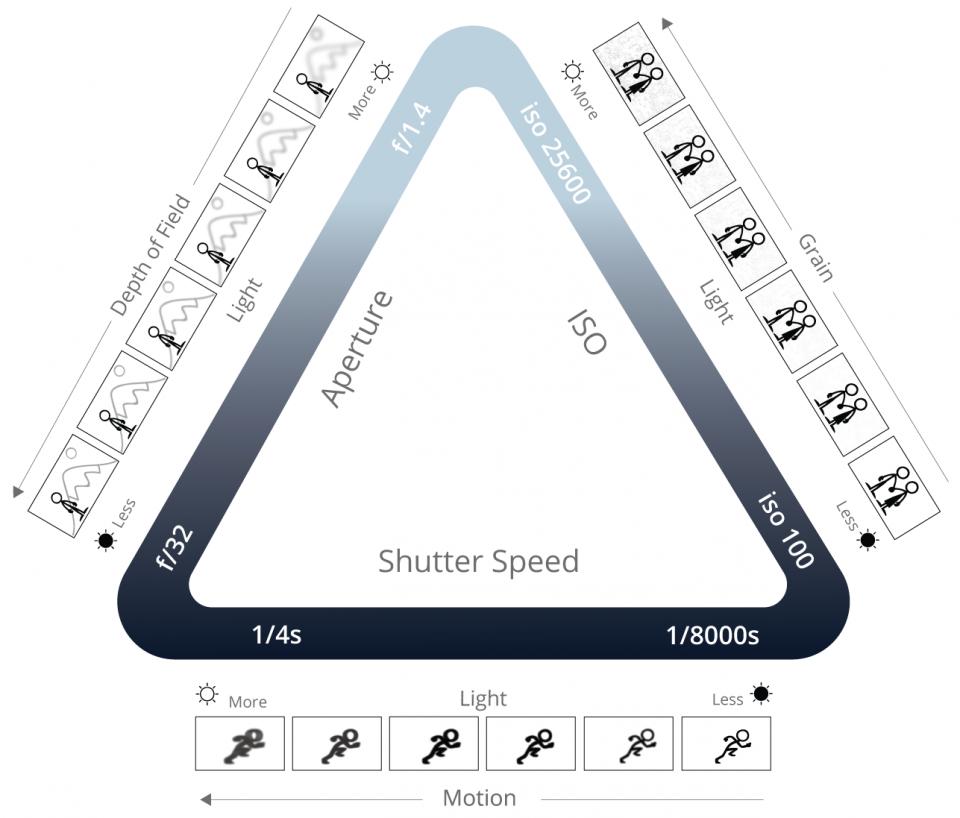
Shutter speed: The amount of time the camera shutter is open to expose light into the camera sensor. To summarise, if the shutter is open for a longer amount of time, more light hits the sensor and if the shutter is open for a short time there will be less light.
The most important use of shutter speed is when you’re shooting a moving object, whether it be a dog running or kids throwing cake at each other. If you want to freeze motion you have to have a faster shutter speed (ex: 1/1000) but if you want to show motion in your pictures, like the movement of a car, you have to choose a slower shutter speed (ex: 1/4sec)
A tip here is that if you don’t own a tripod and you’re planning to hold your camera by hand, it’s better to use a faster shutter speed, for example, 1/50 in order to avoid any signs of your camera shaking in the final photo.
ISO: is a measure of the sensitivity of the sensor to light. The higher the number, the more sensitive to light and the lower the number, your sensor is less sensitive to light. An important rule of thumb: Always keep your ISO low! I know it might seem like a good idea at the beginning to cram up the ISO so your pictures become brighter, but remember, the higher the ISO, the grainer and noisier your photos. When outside with natural light, try to keep your ISO very low, somewhere around 100 and when inside, according to the darkness increase it to somewhere between 400 and 700.
A great tip is to play with each side of this triangle and try to find a perfect balance for different situations and keep in mind that practice makes perfect!
One more tip that is going to save you is to photograph in RAW and not JPEG. The reason for this is, you can play with the light, contrast, white balance, saturation, etc. in postproduction with applications like Lightroom. This is going to help you to correct any errors you’ve made when taking your photos.